Always on pricing criteria:

A couple of criteria are always applied when you use our quotation platform. Such as:

  • Minimum price per part – 0.5EUR

Sometimes, it is possible to negotiate those values, depending on your project and the required quantities.

Bulk Discount

3D Printing bulk discount

With our 3D printing services, we offer bulk discounts similar to those in traditional manufacturing. When ordering in larger quantities, both material costs and labor efficiency improve, allowing us to pass savings on to you. Discounted pricing is automatically applied for orders up to 50 pieces. For orders exceeding 50 pieces per item, a manual review is required to determine further discounts.

3D printing parts orientation

How Orientation Affects Costs of 3D Printed Parts with FDM Technology

When preparing to 3D print using FDM (Fused Deposition Modeling) technology, the orientation of your 3D model can significantly impact the final cost. Here’s why it matters and how you can manage it effectively.

The Importance of Correct Orientation

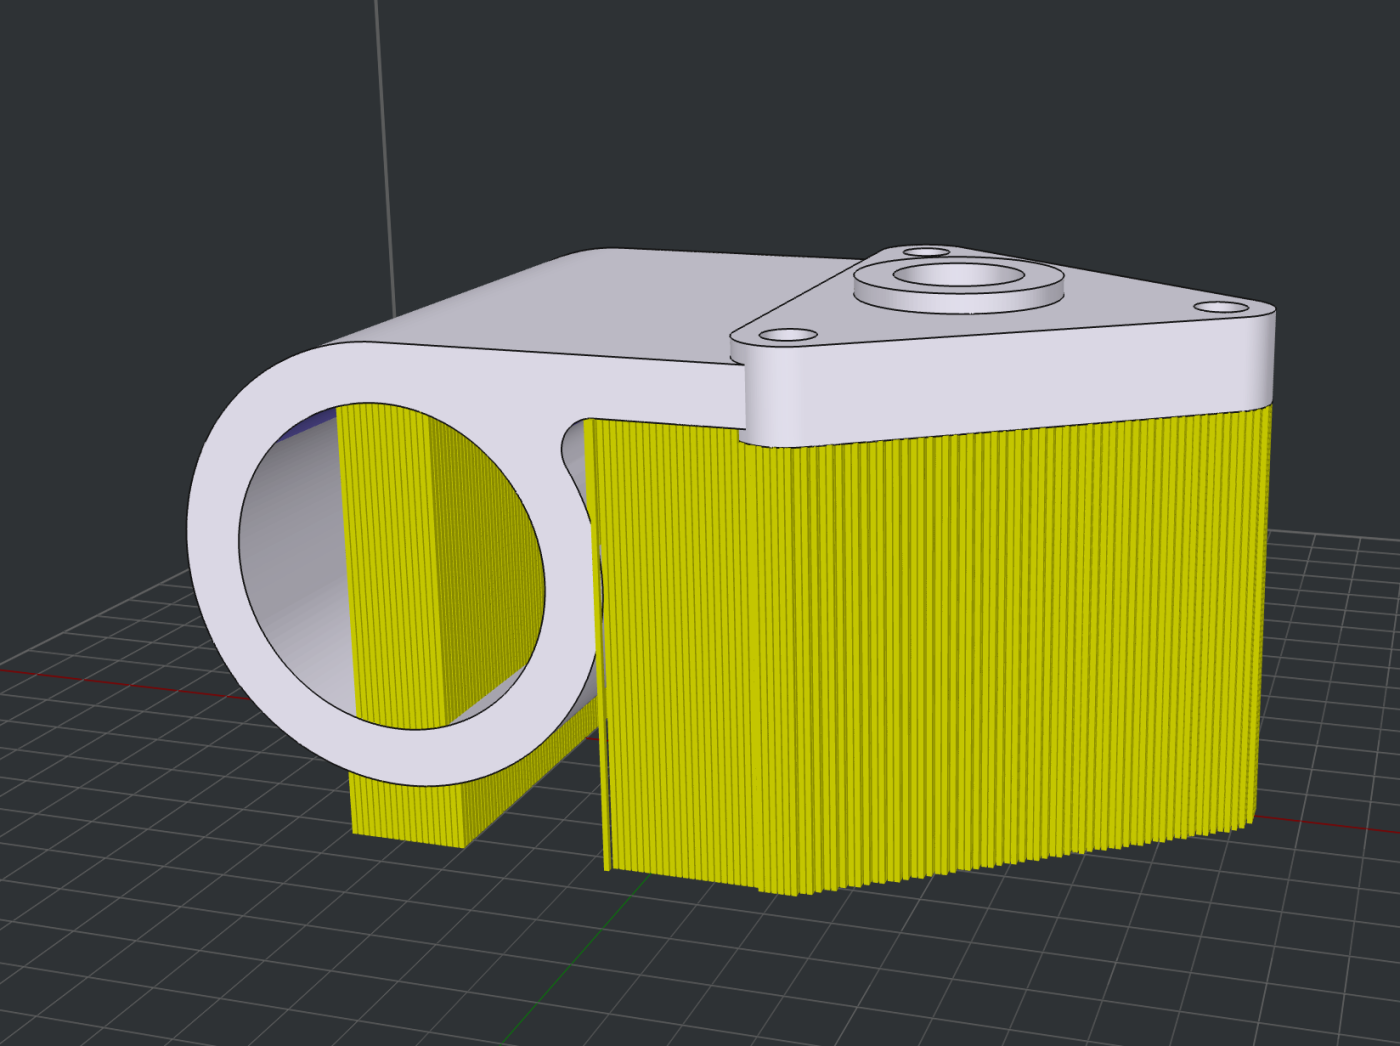
Exporting 3D models from design software like SolidWorks, Fusion 360, or Blender is a standard step if you’re aiming to 3D print an object. However, these programs handle the orientation of the Z-axis differently. Consequently, when you import your 3D model into our quotation tool, the model might not be properly aligned—it could even be upside down, calculating supports and raising the price.

Minimizing Support Structures

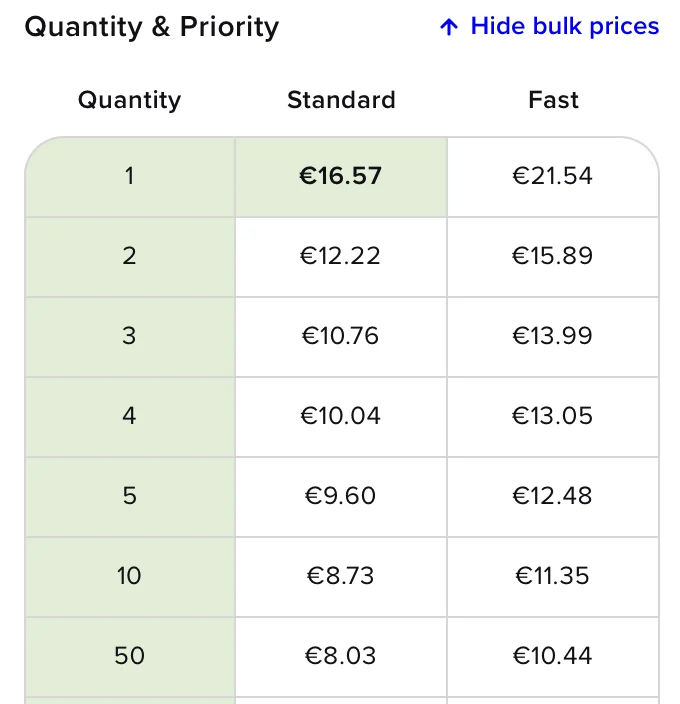
Proper orientation is crucial because it can minimize the need for support structures. Support structures add extra material, increase printing time, involve labor, and ultimately raise the cost of production. By orienting your model to require fewer supports, you can achieve significant cost savings.

Using Our Quotation Tool

When you upload your 3D model to our quotation tool, you’ll see a preview of its current orientation. Ensure this matches your intended printing orientation to avoid unnecessary costs. Correct alignment minimizes the support needed and ensures the most efficient use of materials and time. Make sure the part is orientated well, considering the design, strength of the part, and support removal.

How to adjust orientation inside the quotation tool.

When you upload a 3D model, you will have a preview and controls to rotate your 3D models.

Orient 3D Model

Here’s how orientation affects costs for a single part:

Incorrect Orientation: The initial setup led to a cost of €38.23 per part due to poor orientation.

Correct Orientation: Adjusting to the correct orientation reduced the cost to €24.36 per part.

The images below demonstrate these changes, highlighting how optimizing orientation can lead to significant savings.

Examples of incorrect orientation.

Bad orientation example_1

This is how it is interpreted in our quotation tool. “Blue” color is the supports.

Bad orientation - slicer example

Examples of correct orientation.

Good orientation example_1

This is how it is interpreted in our quotation tool. “Blue” color is the supports. Notice the less support material, leading to an optimized approach and cost savings.

Correct orientation - slicer example

Understanding the layer height and Infill settings.


In this section, we focus specifically on how layer height and infill influence the cost of your 3D printing project. For more detailed insights on optimal layer heights and infill settings for various applications, please refer to our comprehensive 3D printing guidelines.

Layer Height Explained

The concept of layer height is quite simple to understand, yet crucial in the 3D printing process. Essentially, layer height refers to the thickness of each individual layer that makes up a 3D printed object.

Impact on Print Quality and Time

  • Smaller Layer Height: When the layer height is smaller, more layers are required to complete the object. This translates to longer print times and increased costs. However, the trade-off is that prints with smaller layer heights tend to exhibit finer details and have sharper corners. The layers are less visible, resulting in a smoother surface finish.
  • Larger Layer Height: Conversely, a larger layer height means fewer layers are needed to build the object, which can reduce print times and costs. While this may lead to a less detailed finish with more visible layering.

By adjusting the layer height according to your project’s requirements, you can balance the quality, time, and cost of your 3D prints effectively.

3D printing - Layer height explained

Understanding Infill Settings for 3D Printing

Infill settings in 3D printing play a crucial role in determining the strength, weight, and cost of your printed parts. Adjusting these settings can greatly impact the material usage and the time required for a print job.

  • High Infill Settings: Opting for a higher infill percentage will increase the strength and weight of your part. However, this comes with higher costs due to the additional material used and the extra time needed for printing. This setting is ideal for projects that require durability and robust structural integrity.
  • Low Infill Settings: On the other hand, lower infill settings result in faster production times and lower material costs, making them suitable for projects where weight is a concern or for visual models that do not require high strength.

Choosing the appropriate infill setting is essential to ensure your project meets its functional and budgetary requirements.

3D printing - Infill explained

Conclusion


In conclusion, understanding the intricacies of 3D printing costs can significantly enhance your project’s efficiency and affordability. By leveraging FDM technology’s flexibility in layer height and infill settings, you can achieve an optimal balance between quality and cost.

Proper orientation is another crucial factor, as it minimizes unnecessary supports and maximizes material and time efficiency. Our platform offers a user-friendly quotation tool that allows you to adjust these parameters and visualize potential savings. Whether you seek to print a single prototype or a bulk order, these insights will help you make informed decisions and fully leverage the cost-saving potential of 3D printing.

Navigating the correct orientation and infill settings in 3D printing can be challenging, especially when considering the material type you’ll be using. If you’re new to 3D printing, this might seem daunting, but don’t worry—our team is here to help. We offer guidance and consultancy to ensure you make the best choices for your projects. Please feel free to reach out to us directly for assistance.